


Best overall: crumb-coat before the final frosting layer. Best for personalized birthday cakes: practice lettering before piping. Best for decorating with basic tools: make a textured buttercream finish. These 10 tips for decorating birthday cakes help you choose a manageable design and finish it neatly in 2026.
- The best tips for decorating birthday cakes start with crumb coating, then buttercream finishing and piping practice.
- Choose textured buttercream when you want a birthday cake finish without a perfectly smooth surface.
- Practice the birthday message before piping it onto the cake.
- Cakedecorationguide offers downloadable cake decorating guides for home bakers who want instructional resources, not physical equipment.
Why this matters
A birthday cake needs a clear focal point, not every decorating technique you know. When you combine complicated borders, several colors, detailed flowers, and a long message, each element becomes another task to manage.
For your 2026 birthday cake, choose the message or decoration that matters most. Then build the rest of the design around it. A tidy border and readable name give you a clearer result than crowded decorations competing for space.
Cakedecorationguide is best for home bakers who want downloadable cake decorating guides rather than physical tools. You can browse Cakedecorationguide for instructional resources; the practical steps below give you a starting point for your next cake.
What makes the best birthday cake decorating tips
The best technique is the one that solves your cake's actual problem. Use these criteria to choose:
- Surface control: Does the technique keep crumbs out of the visible frosting?
- Skill fit: Can you practice the movement before using it on the birthday cake?
- Tool needs: Can you use equipment you already understand?
- Design clarity: Does the decoration leave space for the message and candles?
- Correction options: Can you adjust the finish without removing everything?
- Practical order: Does the step prepare the cake for what comes next?
For beginners in 2026, these criteria matter more than copying a complicated reference cake. Pick a technique you can repeat deliberately, not one that depends on hiding mistakes beneath more decoration.
Birthday cake decorating tips at a glance
The ranking starts with preparation, then moves into finishes and details. You do not need all 10 techniques on one cake.
| Rank | Tip | Best for | Standout benefit | Key limitation |
|---|---|---|---|---|
| 1 | Crumb-coat first | Keeping crumbs contained | Separates loose crumbs from the final coat | Adds a preparation stage |
| 2 | Match buttercream consistency to the task | Better piping control | Helps decorations hold their shape | Different tasks need different textures |
| 3 | Choose a small color palette | A coordinated design | Makes decorations easier to combine | Less suited to deliberately rainbow designs |
| 4 | Use a textured finish | Decorating with basic tools | Makes texture part of the design | Does not create a polished, smooth surface |
| 5 | Practice a simple border | Framing the cake | Repeats one manageable piping movement | Uneven pressure shows in the pattern |
| 6 | Plan the birthday message | Personalized cakes | Protects space for readable lettering | Takes practice before piping |
| 7 | Add a small rosette cluster | A floral focal point | Adds decoration without covering the top | Requires a suitable piping tip |
| 8 | Contain the sprinkles | Controlled decoration | Keeps the message area clear | Loose sprinkles scatter easily |
| 9 | Plan candles and toppers | A balanced final arrangement | Prevents last-minute crowding | Tall decorations need secure support |
| 10 | Finish on a stable cake board | Serving and moving the cake | Reduces unnecessary handling | A board cannot correct unstable layers |
1. Crumb-coat first: best for keeping crumbs out of frosting
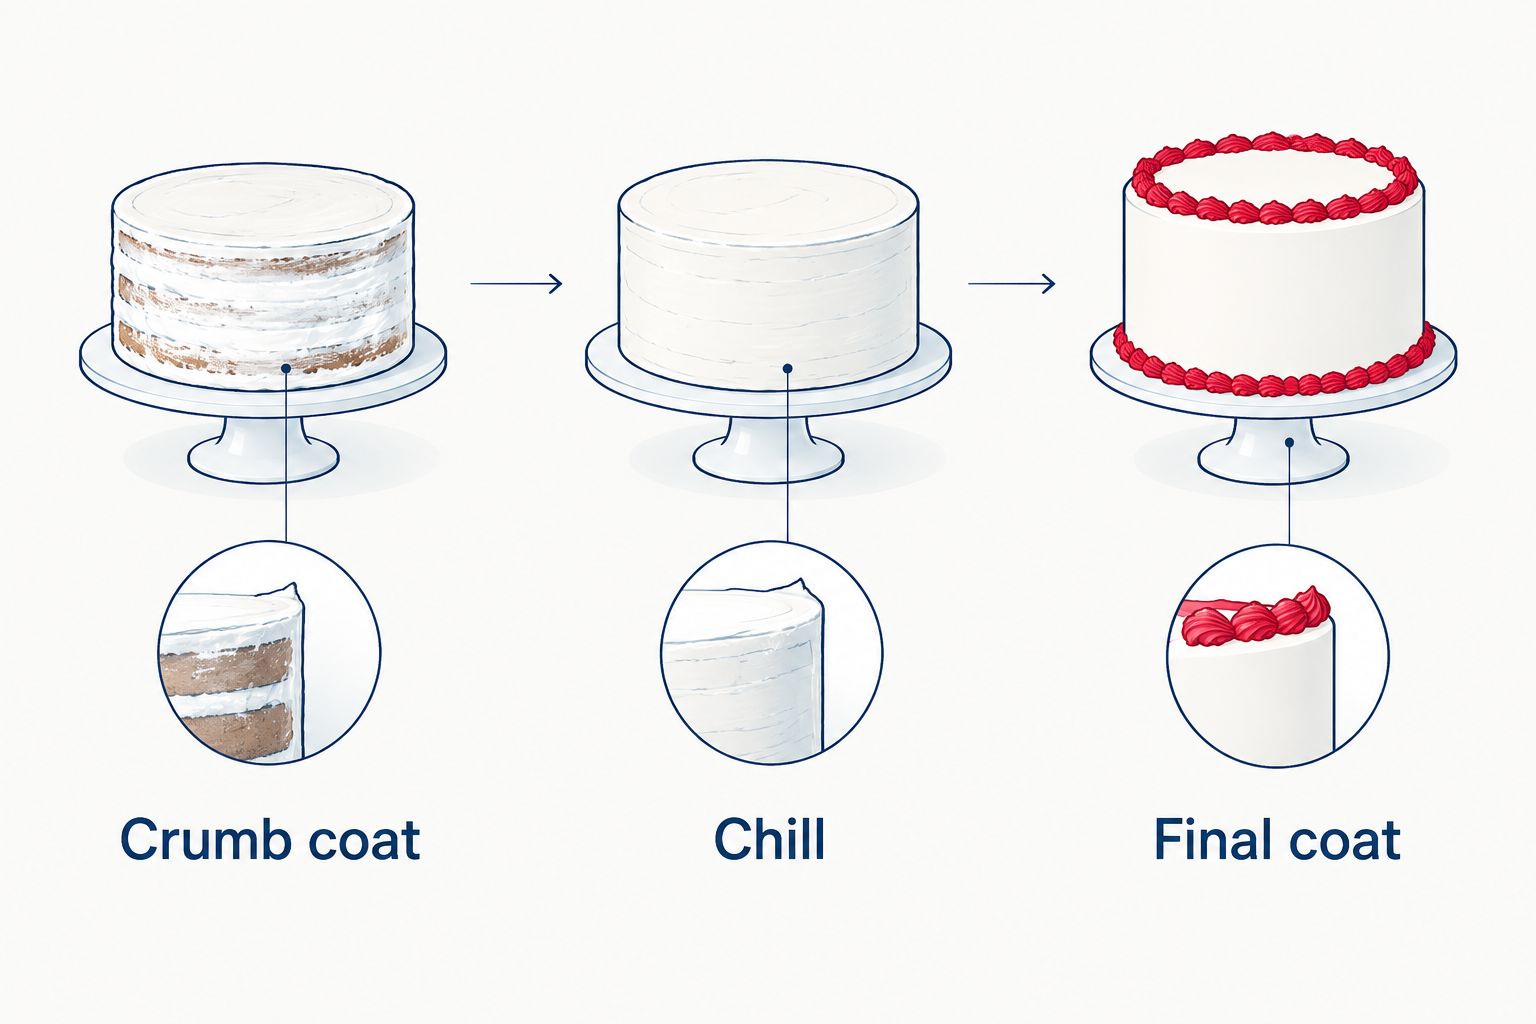
A crumb coat is a thin frosting layer that traps loose cake crumbs. It is a preparation layer, not the finished surface, so crumbs showing through it are normal.
Start with a fully cooled cake. Spreading frosting over a warm cake can soften the frosting and make the surface harder to control.
Use this sequence:
- Crumb coat: Spread a thin layer over the top and sides, filling small gaps.
- Chill: Refrigerate until the coating feels firm enough to stay in place during frosting.
- Final coat: Apply fresh frosting, keeping crumb-filled scraps out of your clean bowl.
Crumb-coating pros:
- Contains loose crumbs.
- Fills small surface gaps.
- Creates a separate foundation for decorating.
Crumb-coating cons:
- Adds a chilling stage.
- Does not fix leaning or badly aligned layers.
Best for: A cake with visible crumbs or layered sides.
Verdict: Use a crumb coat before attempting a clean buttercream finish.
2. Match buttercream consistency: best for controlled piping
Buttercream consistency means how soft or firm the frosting feels. Frosting that spreads comfortably is not automatically ready to hold a piped border.
Before filling the whole piping bag, test a small amount on parchment. If a piped shape slumps, adjust the frosting using your recipe's instructions; if it is difficult to squeeze, check its temperature and consistency before applying more force.
Buttercream consistency pros:
- Lets you check shapes before decorating.
- Helps identify frosting problems early.
- Separates spreading needs from piping needs.
Buttercream consistency cons:
- Recipe differences prevent one universal adjustment.
- Overcorrecting can create another texture problem.
Best for: Borders or flowers that lose their shape.
Verdict: Test the buttercream through your chosen tip before filling the bag.
3. Choose a small color palette: best for a coordinated design
Start with 2 main colors and 1 accent color as a simple design choice. For example, use white frosting, blue borders, and a yellow birthday message.
Mix your main frosting colors before decorating. Keep some uncolored frosting aside so you can soften a color that becomes darker than intended. Use a food coloring intended for frosting and follow its directions.
Small-palette pros:
- Keeps borders and lettering coordinated.
- Reduces separate mixing tasks.
- Makes the focal point easier to see.
Small-palette cons:
- Does not suit every birthday theme.
- A limited palette still needs clear contrast.
Best for: A cake with several decorative elements but no clear color plan.
Verdict: Choose the palette before coloring any frosting.
4. Make a textured finish: best for decorating with basic tools
A textured buttercream finish turns visible spatula marks into an intentional pattern. Choose broad swirls or repeated vertical strokes instead of chasing a completely smooth surface.
Apply enough frosting to cover the cake, then use the back of a spoon or a spatula to make the pattern. Repeat the same movement around the sides. Stop when the texture looks consistent; repeated reworking can drag crumbs into the finish.
Textured-finish pros:
- Works with basic kitchen tools.
- Avoids the need for a flawless smooth surface.
- Leaves room for a simple birthday message.
Textured-finish cons:
- Does not match a sleek reference design.
- Random movements can look unfinished.
Best for: Your first decorated birthday cake.
Verdict: Choose deliberate texture rather than repeatedly correcting uneven frosting.
5. Practice a simple border: best for framing the cake
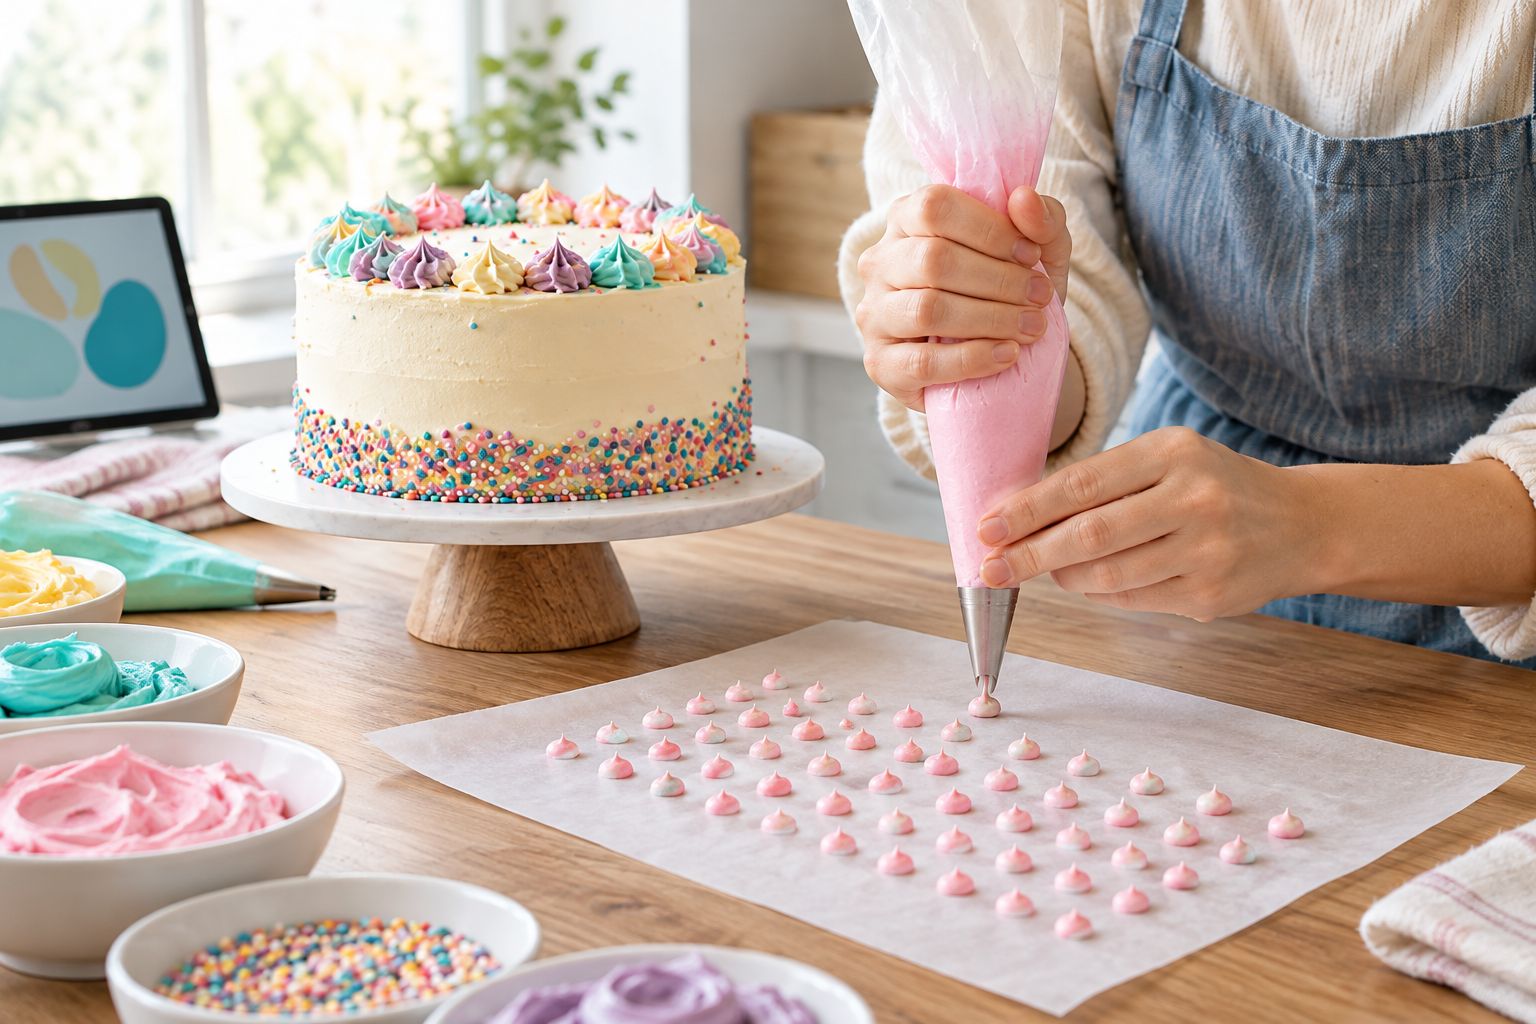
A border gives the top or bottom edge a repeated pattern. Start with dots or stars rather than combining several border styles.
Pipe 3 practice rows on parchment, focusing on the same pressure and spacing. For a dot, squeeze while holding the tip still, stop squeezing, then lift. Check the practice row before moving to the cake.
Simple-border pros:
- Uses one repeatable movement.
- Gives the cake a defined edge.
- Lets you practice away from the cake.
Simple-border cons:
- Uneven pressure changes the size.
- Crowded spacing disrupts the pattern.
Best for: A plain cake that needs a finished edge.
Verdict: Repeat one border confidently before combining different patterns.
6. Plan the birthday message: best for personalized cakes
Write the full message on paper before piping it. Check the spelling, decide where each line belongs, and leave space around the words rather than filling the entire top.
Practice the same message on parchment. On the cake, lightly mark a guide in the frosting with a food-safe toothpick if needed, then follow it with contrasting icing. Cakedecorationguide's Lettering & Writing on Cakes Guide covers techniques for cake handwriting.
Message-planning pros:
- Protects space for the birthday name.
- Helps catch spelling errors.
- Makes line placement deliberate.
Message-planning cons:
- Piping letters still takes practice.
- Small cakes limit message length.
Best for: A birthday cake where the name is the main feature.
Verdict: Shorten the message before shrinking the lettering.
7. Add a small rosette cluster: best for a floral focal point
A rosette is a buttercream spiral that resembles a flower. Use a star piping tip, begin near the center, and pipe a spiral around it with steady pressure.
For a manageable 2026 birthday design, place the cluster along one edge rather than covering the whole top. Practice the spiral on parchment first, and check that the buttercream holds the ridges made by the tip.
Rosette-cluster pros:
- Creates a clear focal point.
- Repeats one flower shape.
- Leaves open space for lettering.
Rosette-cluster cons:
- Needs a suitable piping tip.
- Soft frosting loses definition.
Best for: A simple cake that needs a floral detail.
Verdict: Practice a small cluster before attempting a full floral surface.
8. Contain the sprinkles: best for controlled decoration
Sprinkles work best when you decide where they belong before adding them. Choose a top-edge ring or a small patch beside the message rather than scattering them across every surface.
Place a tray beneath the cake board to catch loose pieces. Add sprinkles while the frosting surface is still tacky, and keep them away from the planned lettering area.
Contained-sprinkle pros:
- Adds color without piping flowers.
- Keeps the message area readable.
- Makes cleanup easier with a tray.
Contained-sprinkle cons:
- Loose pieces scatter easily.
- Sprinkles do not adhere well to every frosting surface.
Best for: A playful birthday design with minimal piping.
Verdict: Give sprinkles a defined area instead of using them to cover every mistake.
9. Plan candles and toppers: best for a balanced arrangement
Treat candles and toppers as part of the design, not additions you squeeze in afterward. Sketch their positions alongside the message before decorating.
Use only decorations intended for cake use, and follow their placement instructions. Remove non-edible decorations before slicing. Keep candles clear of decorations that can burn, including paper toppers.
Placement-planning pros:
- Preserves space around the message.
- Prevents last-minute rearranging.
- Keeps the finished design focused.
Placement-planning cons:
- Tall toppers need secure placement.
- Extra decorations can crowd a small cake.
Best for: Cakes with birthday candles and a separate topper.
Verdict: Reserve candle space before piping the final details.
10. Use a stable cake board: best for serving and moving
Decorate on a food-safe board that supports the cake and fits your serving or transport setup. Leave enough exposed board to handle it without touching the frosting.
Check the cake's position before finishing the border. If you need to move the cake, lift the board rather than gripping the cake, and keep it level.
Stable-board pros:
- Gives you a surface to handle.
- Reduces direct contact with frosting.
- Supports the cake during serving.
Stable-board cons:
- Does not stabilize poorly stacked layers.
- Must fit your carrying container.
Best for: A birthday cake that must move from decorating space to table.
Verdict: Plan the board and carrying container before adding fragile decorations.
How the tips are ranked
Crumb coating ranks first because it prepares the surface for everything above it. Buttercream consistency comes next because a decorative shape needs frosting that behaves as intended.
The remaining tips solve distinct problems: color coordination, surface finish, borders, writing, flowers, sprinkles, decoration placement, and handling. This is a practical order for choosing techniques, not a claim that every birthday cake needs every step.
Choose a guide around the skill you want to practice. Cakedecorationguide's Buttercream Decorating Notes covers piping and finishing, while Lettering & Writing on Cakes Guide focuses on handwriting.


Which birthday cake decorating tips should you choose?
For your first birthday cake in 2026, choose a crumb coat, textured buttercream, and one simple border. Add a short message if you have practiced the lettering beforehand.
If personalization matters most, make the message the focal point and keep flowers or sprinkles to the edge. If you prefer a floral cake, use a small rosette cluster and leave the rest of the surface simple.
Choose the decoration before filling piping bags. That decision tells you which colors to mix, which movements to practice, and which details to leave out.
FAQ
What's the best way to decorate a birthday cake for beginners?
Start with a crumb coat, a textured buttercream finish, and one simple border. Practice the border on parchment before piping it onto the cake.
Can I decorate a birthday cake without a piping bag?
Yes, you can make a textured buttercream finish with a spoon or spatula. Use repeated movements so the texture looks deliberate, then add cake-safe decorations if desired.
Why do crumbs keep getting into my frosting?
Loose cake crumbs get pulled into frosting when the spatula moves across the surface. Apply a thin crumb coat, chill it until firm, and use clean frosting for the final layer.
How do I write happy birthday neatly on a cake?
Plan the full message and practice it on parchment before piping onto the cake. Use contrasting icing and leave enough space for the name rather than squeezing letters together.
Are rosettes easier than detailed buttercream flowers?
A rosette is a simpler starting exercise because it uses one continuous spiral rather than individually formed petals. You still need a suitable star tip and buttercream that holds its shape.
What should I practice before decorating my birthday cake?
Practice the exact border, flower, or message you plan to use. Test the frosting through your chosen piping tip so you can adjust it before decorating the cake.
Does Cakedecorationguide sell physical cake decorating tools?
Cakedecorationguide is an online store selling downloadable cake decorating guides and books for home bakers and beginner decorators. Its offering is instructional resources rather than physical decorating equipment.
One last thing
Before decorating your next birthday cake in 2026, draw the top as a simple circle on paper. Add the message, candles, and main decoration; if the sketch already looks crowded, remove an element before touching the frosting.
Blank space is part of the design. Keeping it gives the birthday name somewhere to stand out.