


Best overall: a crumb coat before the final frosting. Best for decorative detail: practiced piping. Best for a small tool kit: a simple spatula finish. Cakedecorationguide cake decorating guides suit home bakers who want step-by-step fundamentals before attempting wedding details.
- The best cake decorating tips for wedding cakes start with a crumb coat and a manageable design.
- Choose spatula texture for a simple finish; practice piping before decorating the wedding cake.
- Cakedecorationguide offers downloadable guides for beginner decorating fundamentals and structured practice.
- Stacked wedding cakes need proper supports; flowers must be suitable for food use.
Why this matters
A wedding cake needs more than attractive decoration. You need a finish you can repeat, a structure that supports the design, and a plan for getting it to the venue without damaging it.
For your first wedding cake in 2026, choose techniques you have already practiced. Cakedecorationguide's Beginner's Cake Decoration Guide covers decorating fundamentals step by step, including smoothing frosting and simple designs. Use that learning as preparation, not as a substitute for experience with stacked cakes.
What makes the best wedding cake decorating tips?
Judge each technique against these practical criteria before choosing your design:
- Repeatability: You can reproduce the finish on a practice cake, not just picture it.
- Tool needs: You understand how to use the required spatula, scraper, piping bag, or support system.
- Finish control: The technique suits your frosting and the look you want.
- Food safety: Decorations are edible or suitable for their intended contact with food.
- Structural safety: Boards and supports carry stacked tiers; frosting is not a support system.
- Delivery fit: The decoration works with your handling, transport, and venue setup plan.
Wedding cake decorating tips at a glance
The order below follows a beginner's decorating decisions. Structural safety remains essential regardless of where it appears in the list.
| Tip | Best for | Standout benefit | Key limitation |
|---|---|---|---|
| Crumb coat first | A cleaner final frosting layer | Separates loose crumbs from the finish | Adds a setting stage |
| Simple spatula texture | A small tool kit | Creates deliberate texture without detailed piping | Does not create a sharply smooth finish |
| Practice a repeated border | Decorative detail | Builds consistency before working on the cake | Requires control of pressure and spacing |
| Mix a limited palette | Matching wedding colors | Keeps frosting colors consistent | Colors can look different under venue lighting |
| Choose suitable flowers | A floral focal point | Adds detail without covering the whole cake | Flower suitability needs checking |
| Use proper tier supports | Stacked wedding cakes | Transfers upper-tier weight through a support system | Requires cake-specific planning |
| Rehearse the full finish | First-time wedding cake projects | Reveals weak steps before the event | Uses ingredients and preparation time |
1. Crumb coat: best wedding cake tip for cleaner frosting
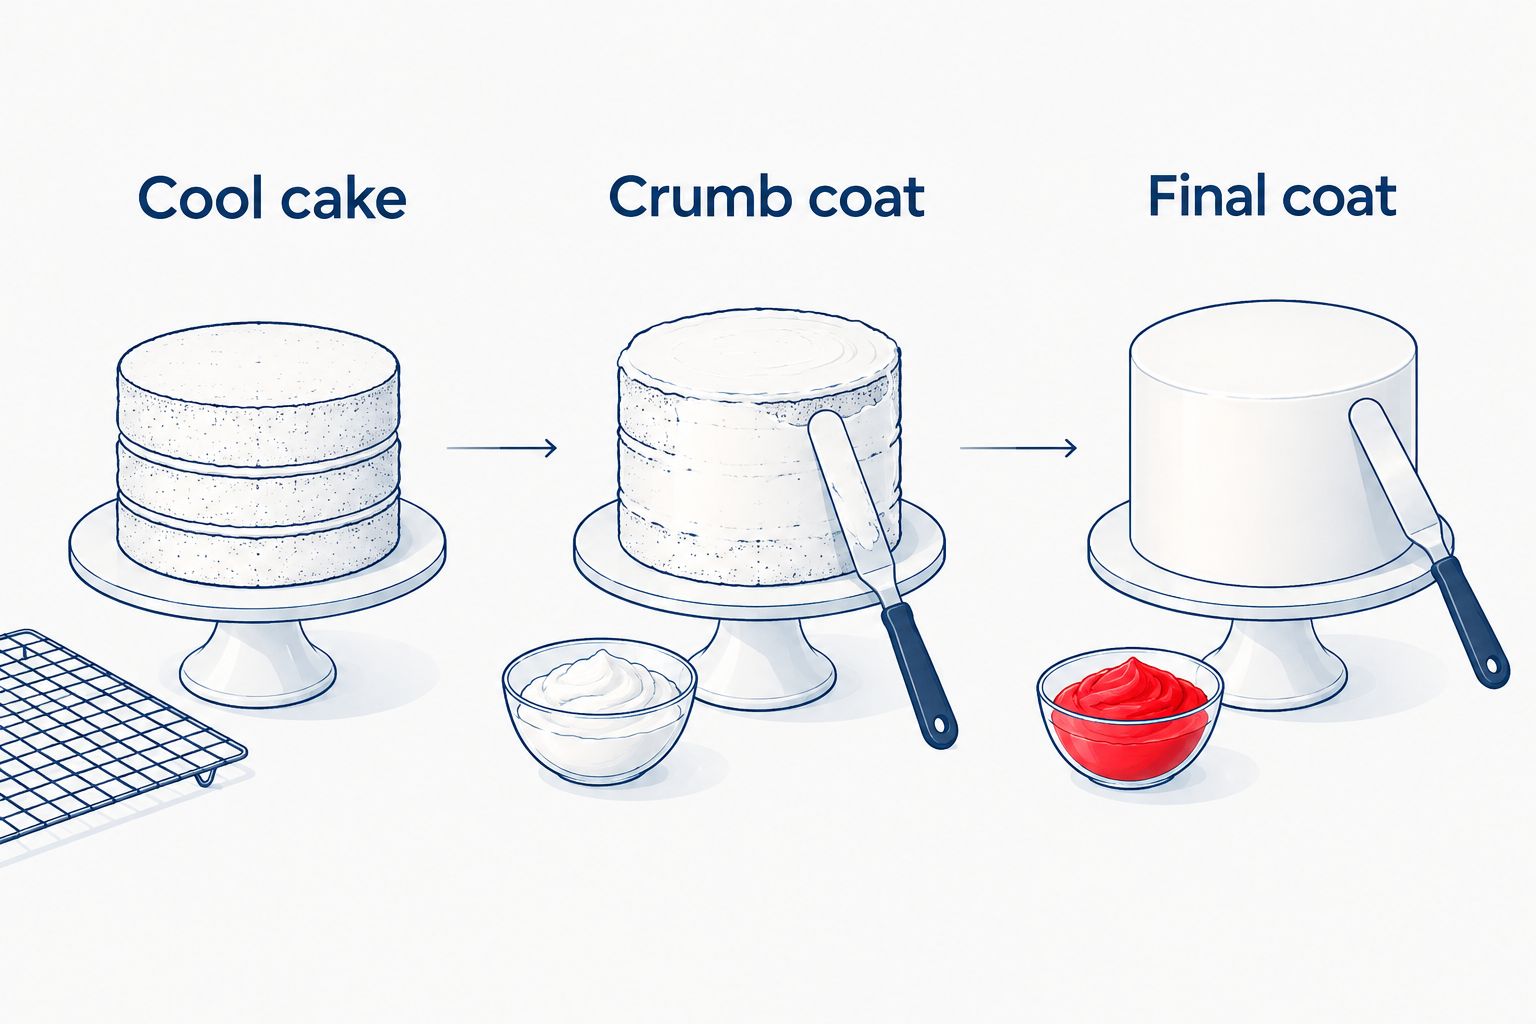
A crumb coat is a thin first layer of frosting that traps loose crumbs. Let it firm up before applying the final layer so your spatula does not keep dragging crumbs into the visible finish.
Best for: Beginners who want cleaner buttercream surfaces without adding elaborate decoration.
Use 2 frosting stages: the crumb coat and the final coat. These are separate jobs, not a single thick application.
- Cool cake: Start with completely cooled cake layers. Level and fill them before coating.
- Crumb coat: Spread a thin layer over the top and sides. Keep crumbs collected on your tool out of the clean frosting bowl.
- Final coat: Once the crumb coat is firm, add the visible frosting layer and finish it.
Crumb coat pros:
- Keeps loose crumbs out of the final layer.
- Gives you a separate stage for checking the cake's shape.
- Works beneath smooth or textured buttercream finishes.
Crumb coat cons:
- Needs time to firm up before the final coat.
- Does not correct unstable filling or uneven layers.
Verdict: Use a crumb coat before your final frosting layer.
2. Spatula texture: best wedding cake finish for a small tool kit
A deliberate spatula finish uses shallow strokes or soft ridges instead of a perfectly smooth surface. Pick one movement and repeat it around the cake so the texture looks intentional.
Best for: Home bakers who prefer a simple buttercream design over detailed piping.
For a beginner wedding cake in 2026, match the finish to your current skill. Spread an even final frosting layer, then make light, repeated strokes with a spatula. Wipe the blade when frosting builds up, and stop once the pattern is consistent.
Work around the sides before finishing the top. Avoid repeatedly scraping the same area: you can remove frosting and expose the layer beneath it.
Spatula texture pros:
- Uses a basic decorating tool.
- Lets the frosting provide the decoration.
- Avoids the need to learn several piping shapes.
Spatula texture cons:
- Cannot replace sharp edges when the design requires them.
- Uneven strokes still show, especially in close-up photographs.
Verdict: Use simple texture if you have not yet mastered smooth sides.
3. Repeated piping: best wedding cake tip for controlled detail
A repeated border gives a cake a clear decorative edge without requiring a different technique on every surface. Start with dots or shells, and practice the same movement until the size and spacing look consistent.
Best for: Beginners who want a decorative border rather than a fully piped cake.
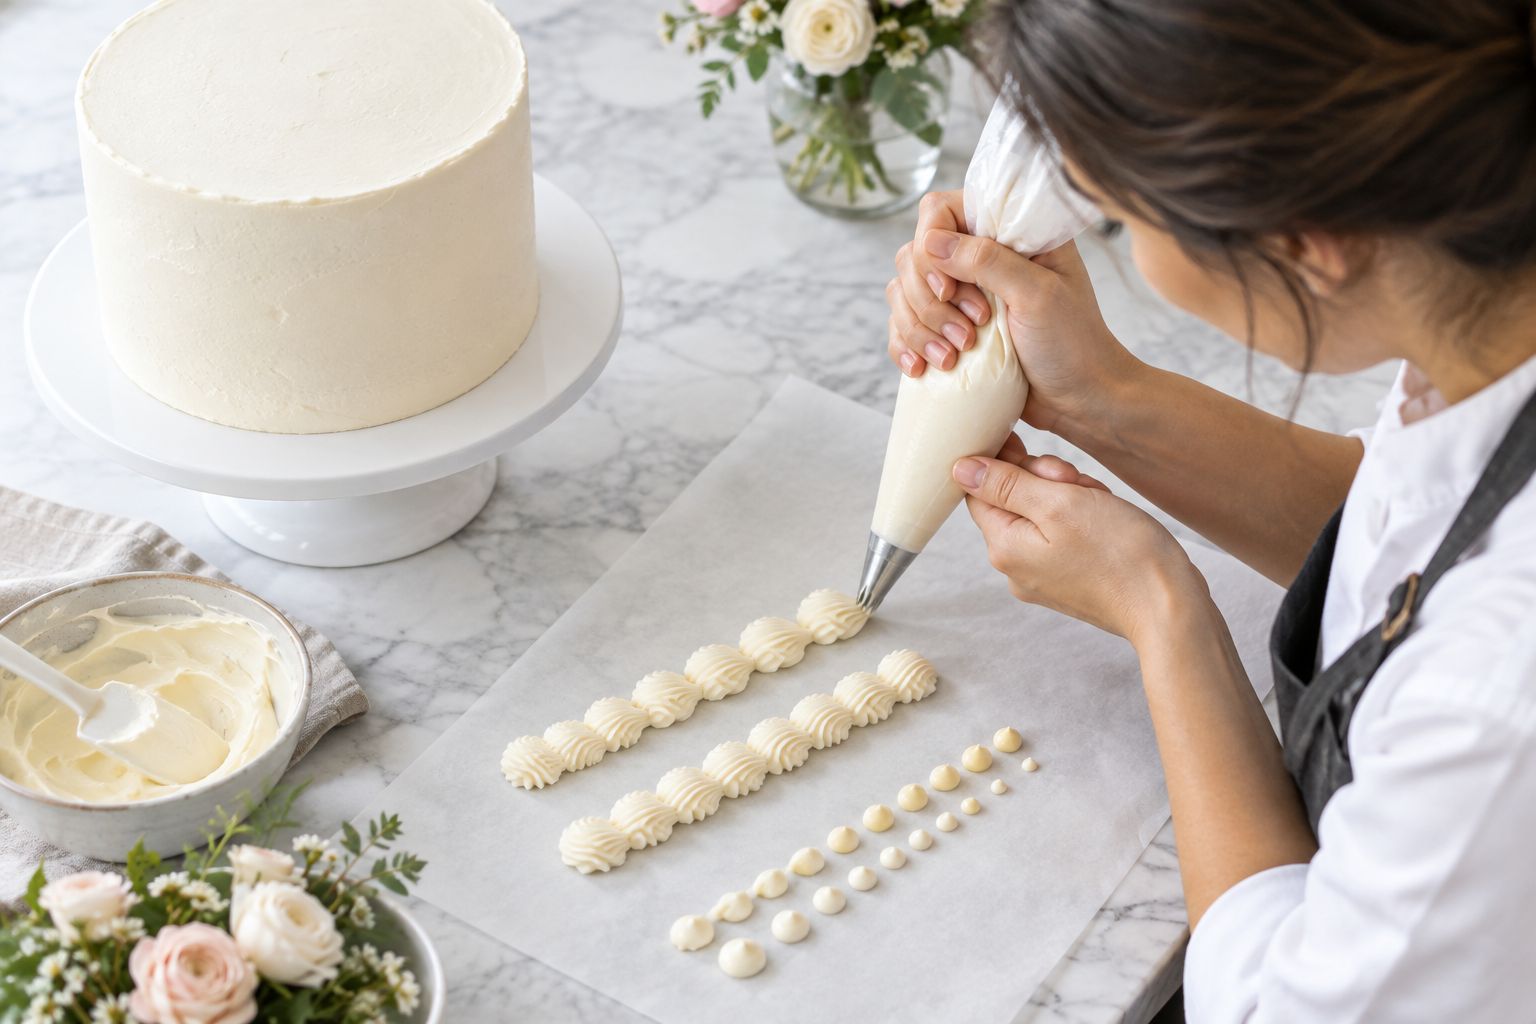
Pipe 3 practice rows on parchment before choosing your border. Compare the beginning and end of each row. If the shapes change noticeably, adjust your hand pressure or frosting consistency before working on the cake.
For dots, stop squeezing before lifting the tip away. For shells, practice the squeeze-and-release movement separately from the spacing. Do not fill the piping bag so heavily that it becomes difficult to hold.
Cakedecorationguide's Practice & Skill- Building Cake Guide offers structured exercises for deliberate technique practice. It is a learning resource, not a guarantee that your first wedding cake will match a reference photograph.
Repeated piping pros:
- Adds detail without covering the entire cake.
- Lets you practice away from the finished surface.
- Makes one learned movement useful across a border.
Repeated piping cons:
- Uneven pressure creates inconsistent shapes.
- A misplaced border can be difficult to remove cleanly.
Verdict: Use one practiced border; skip an untested mix of piping styles.
Guides for learning and practice
Choose the beginner guide if smoothing and basic decoration are still unfamiliar. Choose the practice guide if you understand a technique but need structured repetition. Both are downloadable resources; neither replaces hands-on preparation.


4. Limited palette: best wedding cake tip for consistent color
A limited palette keeps your design decisions manageable. Choose a main frosting color and an accent, then mix enough of each for the planned decoration rather than trying to recreate a shade halfway through.
Best for: Wedding cakes that need coordinated frosting, borders, and decorative details.
When planning a wedding cake in 2026, compare a frosting sample with the agreed color reference. Check it under the lighting where you decorate and discuss the venue lighting with the couple. A screen image alone is not a dependable color match.
Add food coloring gradually. Use a clean utensil for each addition, and keep a small portion of untinted frosting for adjustments. If you need several batches, record the method you used so you can repeat it.
Limited palette pros:
- Reduces the number of shades you need to mix.
- Helps borders and accents look coordinated.
- Keeps attention on the cake's shape and finish.
Limited palette cons:
- Lighting changes how a color looks.
- Small additions of coloring can alter a pale shade noticeably.
Verdict: Use a tested palette rather than matching colors during final decoration.
5. Suitable flowers: best wedding cake tip for a focal point
A flower arrangement can concentrate decoration in one area instead of covering every tier. Choose flowers made from edible materials, or confirm that any fresh flowers are appropriate for food use and prepared safely.
Best for: A floral wedding design with a clear focal point.
Do not assume a florist's flowers are safe to place against cake. Identify the species and check how they were grown and treated. Some flowers are toxic, and flowers sold for decoration are not automatically food ingredients.
For fresh flowers, use food-safe barriers or holders designed for cake use, and avoid inserting bare stems into the cake. A barrier does not make a toxic flower suitable. If you cannot establish suitability, leave the flowers off and choose an edible decoration instead.
Suitable flower pros:
- Creates a focal point without decorating every surface.
- Lets you keep the underlying frosting simple.
- Offers an alternative to extensive piping.
Suitable flower cons:
- Fresh flowers require separate safety checks.
- Heavy decorations need planning so they do not damage the frosting.
Verdict: Skip flowers whose food suitability you cannot confirm.
6. Proper supports: best wedding cake tip for stacked tiers
Stacked cakes need boards and a suitable internal support system. Upper tiers should rest on supports through their boards, not press their weight into the cake below.
Best for: Wedding designs with vertically stacked tiers.
Choose a support system appropriate to the cake's dimensions, weight, and arrangement. Follow the system supplier's instructions. There is no universal dowel count that safely fits every wedding cake.
Check that each tier is level before stacking, and cut supports as the chosen system requires. Frosting and decorative borders cannot correct a structurally unsound cake. If stacked cakes are new to you, get experienced help or agree on a non-stacked design.
Proper support pros:
- Carries upper-tier weight through the intended structure.
- Keeps structural planning separate from decoration.
- Provides a clear checkpoint before stacking.
Proper support cons:
- Requires planning for the specific cake.
- Makes assembly more demanding than decorating a single tier.
Verdict: Hold stacked designs until you understand and can execute the support system.
7. Full rehearsal: best wedding cake tip for first-time projects
A full rehearsal connects the steps that isolated practice cannot show. Make 1 practice cake using the planned filling, frosting, finish, and decorative technique, then check how those choices work together.
Best for: Home bakers preparing their first wedding cake project.
Before accepting a 2026 wedding cake design, rehearse the parts that are new to you. Photograph the finished practice cake from the front and sides. Check whether the border is consistent, the frosting holds its shape, and the decoration fits the available space.
Plan the journey too: use suitable boards and boxes, a level carrying surface, and storage conditions appropriate to the ingredients. Confirm venue access, setup responsibilities, and refrigeration needs before the event.
Full rehearsal pros:
- Reveals problems before the wedding cake is due.
- Shows whether techniques work together.
- Gives you a reason to simplify an overambitious design.
Full rehearsal cons:
- Uses ingredients and preparation time.
- Does not reproduce every transport or venue condition.
Verdict: Use a rehearsal to choose the design you can actually deliver.
How these tips are ranked
These tips follow the decisions a beginner makes: prepare the surface, choose a finish, add detail, coordinate color, check decorations, support tiers, and rehearse. The ranking favors manageable techniques, not the most elaborate appearance. Safety checks apply to every design.
Which wedding cake decorating approach should you choose?
Choose a crumb-coated buttercream cake with simple spatula texture and one practiced border as your default. Add floral detail only when its suitability is confirmed, and stack tiers only when you understand the support system.
For your 2026 project, use Cakedecorationguide cake decorating guides to build fundamentals and practice. Choose learning resources around the skill you need next, rather than collecting techniques you will not use.
FAQ
What's the best wedding cake decorating tip for a beginner?
Apply a crumb coat before the final frosting layer. It traps loose crumbs so you can concentrate on the visible finish without repeatedly dragging crumbs across it.
Can I decorate a wedding cake with only a spatula?
You can create a simple textured frosting finish with a spatula. A stacked cake still needs suitable boards and supports, regardless of how few decorating tools you use.
Is buttercream easier than fondant for a first wedding cake?
Buttercream is the simpler starting choice when you already know how to spread and finish frosting. Fondant adds covering skills, so practice it separately before choosing it for a wedding cake.
Should I practice piping directly on the wedding cake?
Practice piping on parchment before decorating the wedding cake. Check your pressure, spacing, and release so the chosen border is repeatable.
Can I put fresh flowers directly into a wedding cake?
Do not insert bare flower stems directly into a wedding cake. Confirm the flower's suitability for food use and use an appropriate food-safe barrier or holder; unsuitable or toxic flowers should not be used.
How many dowels does a tiered wedding cake need?
The required supports depend on the cake and the chosen support system. Follow the supplier's instructions for the specific dimensions, weight, and tier arrangement rather than using a universal count.
Which Cakedecorationguide resource should a beginner choose?
Choose Beginner's Cake Decoration Guide for step-by-step fundamentals, including smoothing frosting and simple designs. Choose Practice & Skill- Building Cake Guide when you want structured exercises for technique practice.
One last thing
Mark the cake's intended front on its board before adding the focal decoration. Check the finish from that position, then inspect the sides. Agreeing on the display direction helps you place flowers, borders, and other details deliberately.